
I wrote this tutorial one day after reading another online tutorial for installing brushes via the Adobe files on one’s C-drive. That way works great, cut and dry! But, it adds to the program’s size and, eventually, this can really slow down the loading and performance of the PS program.
Did You Know…?

I want to show you all, once and for all, how easy it is to load presets into Photoshop. This method works for all presets, is semi-permanent and takes very little space on your hard drive. It’s called the ‘Preset Manager’.
(Note: I use CS6. It’s possible that you don’t see all the presets listed in CS6 in Elements. It is my understanding you can access some others by clicking on ‘More’ in Layer styles/effects. This may not be correct, so, the best I can do is tell you to Google installing these. Sorry!)
We already know that a ‘pre-set’ is a brush, style, pattern, color palette, shape, etc. What better way to deal with these than through the Preset Manager(PM). You can access the PM by going to Edit>Presets>Preset Manager.
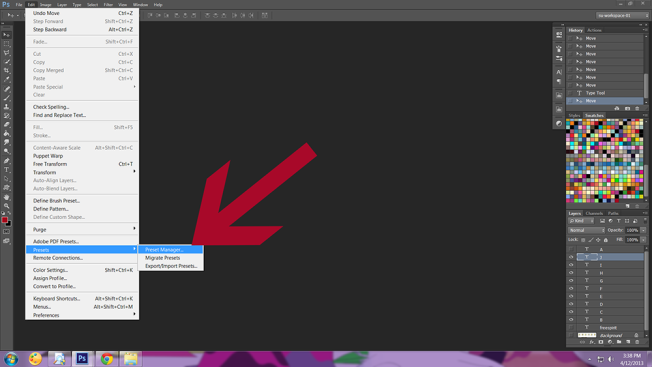
Or, you can access it by going to any of the preset tools and clicking on the tiny icon at the top on the right.


The Preset Manager

This is where all the action takes place. I have my ‘brush’ manager open. It’s getting full! LOL
Now, obviously, as with the tutorial that inspired me to write this one, you can drop the individual presets into their perspective folders in Adobe’s files on your hard drive. They are inside the program and will be until you manually remove them from that folder. Follow this path, or one similar, on your pc: C:Program Files (x86)AdobeAdobe Photoshop CS6Presets. But, this adds them to the program ‘permanently’, in a way that makes it load slower. (If you have too many loaded this way, when you try to change or ‘Re-set’ a preset, often, the entire list/menu isn’t viewable.) I would only recommend doing this for special presets that you use all the time – as in every day. By adding them to the PM, they stay in the program until you remove them, but, they don’t count near as much, if anything, against the program as far as taking up space and taking longer to load.
Check out the options you have with the PM:
If you want to load a new preset:

A window will open, then, navigate to the preset you want on your hard drive.
If you want to save an assortment of presets you frequently use, click on the ‘Save Set’ button. (I save the ‘best of’ certain brushes, like ‘clouds’, for example, into one set for frequent use – making sure the designer’s name is on the individual preset for crediting, then, I label the set accordingly and save):

First, click on the preset you want to save. If there are multiple presets, like if you just created a set of 24 gorgeous rose brushes, you need to click on the first preset, then, hold down the Shift key and click on the last preset you want. All of the presets in between should be highlighted, too. Or, you can hold Ctrl/Command and click on each preset, one at a time. Either way, when you have selected all the presets you wish to save, click on the ‘Save Set’ button. (Some buttons will appear ‘grayed-out’ until you select at least one of the presets.) Navigate to the place on your hard drive where you want to save and name it something catchy. Be sure to include your name or initials in the title! Click Save.
Similarly, to Rename or Delete a preset, or presets, highlight the specific preset(s) and click on the appropriate button:

WHEN YOU DELETE A PRESET FROM THE PRESET MANAGER IT DOES NOT GO AWAY FOREVER! It is just no longer in your manager. If you need it again, go through the steps to ‘Load’ it again.
When you are done with all your presetting, click ‘Done’.
I use the term ‘preset’ throughout this tutorial. Replace it with whatever you like – Brush, Style, Custom Shape, etc. The same PM can be used for any and all presets, except Actions. Here’s how! At the top of the PM is a drop down menu.

You can go to any of the other presets via the same manager. (Exception: Actions – no PM.)
So! Any time you want to know how to load a brush or a pattern, maybe, the only thing you need to remember is the Preset Manager. You don’t even have to reboot PS when you add a preset via the PM! Jus’ keep on goin’! LOL
Any time I can find a way to expedite the actions I perform with Photoshop, it is good. Keystroke shortcuts are real helpful in performing many tasks quickly. We haven’t learned any new one’s lately, so, how about this one?
Key-Stroke Shortcut
Ctrl/Cmd>’E’
This keystroke shortcut is one you can use to merge selected layers together. Say, you are working on a layout and you have created the textured background. With all the blending modes and adjustments, like Levels and Color Balance, often, when done, you may want to merge those layers together. This can save space in the Layers Palette for the rest of the layout. There are other ways to Merge – right-click and select Merge Layers, Flatten, Merge Down, Convert to Smart Object, etc. This shortcut allows you to select multiple layers (hold Ctrl/Cmd and click on each layer you want to include in merge), then, hold Ctrl/Cmd and hit ‘E’. Takes care of that! LOL
I hope these things help you! If you have any questions, please leave a comment and I will respond ASAP.
Thank you so much for your visit!
Su

Thank You Su
LikeLike
Pingback: CraftCrave | Blog | Scrapbooking Tutorials (large): Saturday, 20 Apr 2013
Pingback: Freebie – Final Parts ‘Spring is in the Air’ | suruha
Thank you for this tutorial Su
Brushes have kept reloading and reloading until I get frustrated in finding what I want. This helped me know how to delete all those duplicate brushes. THANK YOU
LikeLike
Yay! That is why I do this! Thanks!
LikeLike